

Ve technics sl 2000 en fr Tbchnics byPanasonic i sL- Read these instructions completely before operating this set Nous vous recommandons de lire attentivement ces instructions avant d'utiliser cet appareil www hi ?engine com CParts identi ?cation AC power
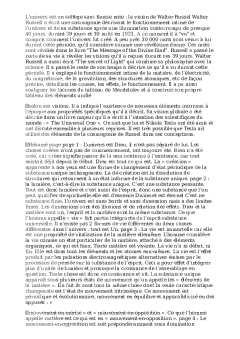
Tbchnics byPanasonic i sL- Read these instructions completely before operating this set Nous vous recommandons de lire attentivement ces instructions avant d'utiliser cet appareil www hi ?engine com CParts identi ?cation AC power plug Fiche du lil d'alimentation Hinge Charnières Shell stand Support de coquille Turntable mat Disque protecteur ldenti ?cation des pièces Phono terminals f Ground wire Fil de terre rpm adaptor Adaptateur pour disques tours mn Balance weight Contrepoids Stylus pressure ring Bague de réglage de la pression de la pointe Anti-skating control knob Compensateur de Motor shalt Centre spindle Arbre du moteur central Strobe dots s stl Turntable platter Plateau Eclairage des repères stroboscopiques lampe-pilote Arm rest Reposoir du bras de leclure Cueing lever Levier d'attente Tubular arm Bras de lecture tubulaire Pitch control knobs Commandes de variation du Locking nut de Power switch speed selector lnterrupteur d'alimentation sélecleur de vitesse Headshell Strobe dot indication lndicateur des repères stroboscopiques We want to thank you for selecting the SL- di rect drive turntable For optimum performance we recommend that you read these instructions carefully Nous vous félicitons d'avoir arrêté votre choix sur ce tourne-disque à entra? nement direct SL- A ?n d'en obtenir un rendement optimal nous vous recommandons de lire attentivement les instructions qui suivent Assembly and set-up Assemblage et réglages Note Do not connect the AC power plug to the wall socket before the assembly has been completed Attach the dust cover at the last stage of the assembly so that assembling of other parts and adjustments can be made conven iently Mise en garde Ne jamais brancher le f il d'alimentation avant que le tourne- disque ne soit entièrement assemblé Ne monter en place le couvercle protecteur qu'en toul dernier lieu ceci alin de faciliter le montage des autres pièces OAlter opening the packing case check to make sure thal your player system is packaged as per the list below' Playerunit Partsbox ' Turntable platter lSrp adaptor tl Turntable mat lBalance weight l Dustcover lHOveearhoansgnegaltu g e l J WARNING TO PREVENT FIRE OR SHOCK HAZARD DO NOT EXPOSE THIS PRODUCT TO RAIN OR MOISTURE '' OVériliez le contenu de I'emballage alin de vous assurer qu'aucun des articles énumérés ci-dessous ne manque Tourne-disque Bo? te d'accessoires Plateau Adaptateur pour disques Disque protecteur en tours caoutchouc Contrepoids Couvercle protecteur Coquille de la cartouche Gabarit de réglage du porte-à-faux MISE EN GARDE AFIN DE PRÉVENI R TOUT RISQUE D'INCENDIE OU DE cHocs ÉlecrnrQuES ÉvlEn D'EXPOSER CET APPAREII- À M PLUIE OU À UNE HUMIDITÉ EXCESSIVE - - www hi ?engine com COverhang adjuslment screw Vis de réglage du porte-à-faux Overhang adjustment screw Vis de réglage du Porte-à-faux Nut Ecrou Shell spacer d'épaisseur ORemove the tape holding the tonearm in position lnstallation of the turntable platter OPlace the turntable platter on the motor shatt centre spindle Place the turntable mat on the platter lnstallation ol the cartridge OConnect the lead wires to the cartridge terminals White L LeTt channel Blue L- Red R Left channel - Right channel
Documents similaires


-
26
-
0
-
0
Licence et utilisation
Gratuit pour un usage personnel Aucune attribution requise- Détails
- Publié le Jan 09, 2022
- Catégorie Industry / Industr...
- Langue French
- Taille du fichier 74.6kB