Guide to Getting Started with ReSocially 1. Dashboard The “Dashboard” shows you
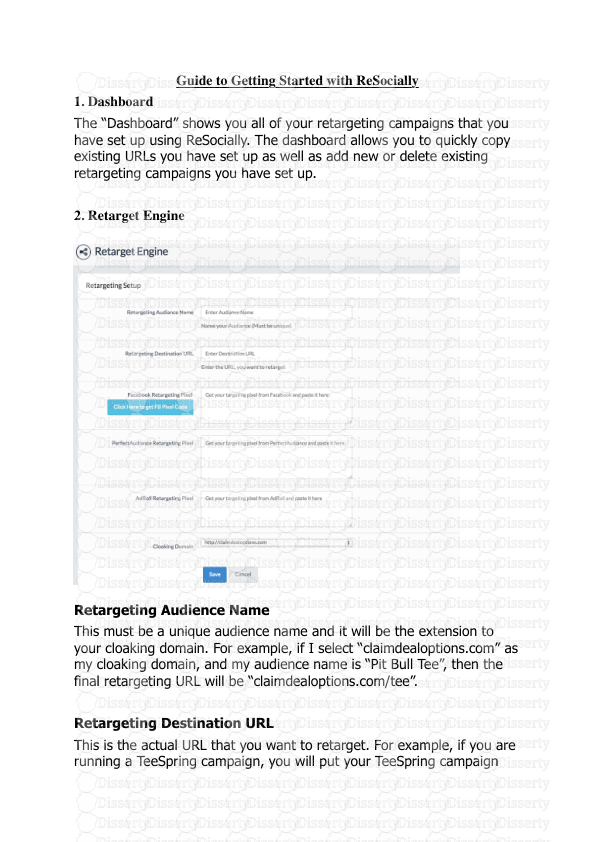
Guide to Getting Started with ReSocially 1. Dashboard The “Dashboard” shows you all of your retargeting campaigns that you have set up using ReSocially. The dashboard allows you to quickly copy existing URLs you have set up as well as add new or delete existing retargeting campaigns you have set up. 2. Retarget Engine Retargeting Audience Name This must be a unique audience name and it will be the extension to your cloaking domain. For example, if I select “claimdealoptions.com” as my cloaking domain, and my audience name is “Pit Bull Tee”, then the final retargeting URL will be “claimdealoptions.com/tee”. Retargeting Destination URL This is the actual URL that you want to retarget. For example, if you are running a TeeSpring campaign, you will put your TeeSpring campaign URL into this text area. Facebook Retargeting Pixel This is where you place your Facebook Pixel Code. In order to get your Facebook Pixel Code, either click on the “Click Here to Get FB Pixel Code” button from within the software or go to: https:// www.facebook.com/ads/manage/audiences.php (You can save your FB Retargeting Pixel under the “Settings” tab so that it will automatically display each time you create a new campaign). Then click on “Create Audience” in the top right hand corner. Then select “Custom Audience” from the drop-down menu as shown below. A pop-up will appear. Click on “Website Traffic”. The following page will appear if it’s your first custom audience. Click on “Create Audience”. You will then be shown the screen below. From the “Website traffic” drop-down menu, select “People who visit specific web pages” as shown above. Click on the gear icon in the bottom left corner. Select “View Pixel Code” All you then have to do is copy and paste the 15 numbers inside the inverted commas next to “addPixelId” into the software’s “Facebook Retargeting Pixel” text area as shown below. Once you have pasted the pixel code into the “Facebook Retargeting Pixel” text area in the software, select your cloaking domain (for more information on the cloaking domain, scroll down) and then click on “Save” once you have selected a cloaking domain. When you click on “Save”, you will be taken to the screen shown below. Click on the “Copy URL” button. Now go back to your Facebook custom audience page as shown below. Paste your retargeting URL you just copied from the software into the “URL Contains” text field as shown above. And then for the “In the last” option, it is 30 days by default. I prefer to make it 180 days. This way, you will be targeting anyone who visits your website for the next 180 days. The length of this should depend on the campaign you are running as well as your audience size. Finally, give your audience a name (should have something to do with your campaign so you can easily identify it). Click on “Create Audience” when you have completely set it up as described above. Now Facebook takes some time to update it’s audience stats, so once you have traffic going to your retargeting link, give Facebook some time to refresh the stats on the https://www.facebook.com/ads/manage/ audiences.php page. (You should send all your traffic to your cloaked link, for example, http://claimdealoptions.com/Share/Broad_Tee. So use your cloaked link from the software in your ads). When the stats start updating (when your audience is big enough – it needs at least 20 people), you can click the checkbox next to your campaign as shown below and then click on “Create Ad” as shown below. The “Create Ad” button is greyed out right now because I just created this audience and it has no audience to run retargeting ads to yet. You can go ahead and select your advertisement objective etc. Scroll down to “Step 2: Create Your Ad Set” and click on “Custom Audiences” as shown below. A drop-down menu will appear with all your saved custom audiences. Select your one that you want to retarget and continue with your ad setup. PerfectAudience & Adroll Retargeting Pixel The same principle applies here. All you have to do is place your AdRoll or PerfectAudience retargeting pixels into the respective text area, depending on whether you have an account with Perfect Audience or AdRoll. See detailed steps below Please note, PerfectAudience & AdRoll are for retargeting across the web. The Facebook retargeting pixel is just for retargeting on Facebook. So if you just want to retarget on Facebook, paste your Facebook pixel code into the “Facebook Retargeting Pixel” text area and leave the PerfectAudience and AdRoll Retargeting Pixel text area blank. PerfectAudience Retargeting Pixel Firstly, if you are using PerfectAudience for the first time, you can sign up for a free trial with an Ad budget of up to $100. If you are already familiar with PerfectAudience, and have an account, still follow these steps to ensure ReSocially works in line with your goals. At the time of signing up (or adding another domain if you already have an account), make sure that you specify a domain. Free users can only have one domain, so be sure to choose from our list of cloaking domains from ReSocially (or if you are lucky enough that you own the site with the offer you want to promote to, enter that domain in there). Once you’re ready to start your retargeting campaign, the first thing we need from here is the pixel...so we can insert it into our ReSocially Campaign. To get the Pixel, from the Dashboard, click Manage -> Site Tracking Tag. You will be taken to this screen with the code – from here, just click the ‘Copy to Clipboard’ button to copy, and paste the code into your ReSocially form. Next, we want to ensure that every single person who clicks on your link, generated by ReSocially, goes into a list to be retargeted. Go to Manage -> Create Lists. Fill out this form and click ‘Create Retargeting List’ to save: The next step, if you would like to only pay a commission for every time someone buys one of the products or offers you’re promoting (instead of paying for Ads of mere sightings of your ad, or even visitors that don’t actually buy), you’re going to want to set up some Conversions. Go to Manager -> Create Conversion Again, fill out this form and click ‘Create Conversion Goal’ to save. And lastly, now that our pixel is embedded in ReSocially, we have created a list to funnel visitors into to keep being retargeted, AND we’ve said that we only want to pay a commission per Ad that brings us a paying customer, it is now time to set up your Ads. Go to Manage -> Create Ads You’ll come to this window: all you need to do is click on the type of Ad you want to run at the top: Facebook Ad, News Feed Ad, Product Ad or Banner Ad. And then, fill out the form with all your Ad details, and click ‘Upload and submit for review. AdRoll Retargeting Pixel Again, if you are using AdRoll for the first time, or if you already have an account, follow these steps to create your retargeting campaign alongside ReSocially: Once you’ve signed up and confirmed your email, you will probably be directed to the Dashboard (see screenshot below). All you need to do is click ‘Create a new Campaign’: Select what this campaign is going to be for: we recommend using ‘General Websites’, so click on that: In this window, click on ‘Show Advanced Options’ on the bottom right hand side so you can see this same, full window below. Fill it out & click ‘Next Step’: In the next window, click on ‘Create New Ads’ to create your ads, like you would on Facebook or PerfectAudience: And in the last step, confirm everything & add your payment method for the Ads & that’s your campaign set up! Now, lastly, after everything has been saved, you still need your Pixel! At the bottom of the last window, you would have seen this: And this pop up window will appear. Click ‘Copy’ and paste it into the ReSocially Form. Cloaking Domain This is the domain that you will use for your Facebook ads. All you have to do is select a cloaking domain from the drop-down menu. Depending on your unique audience name as well as your selected cloaking domain, the software will generate a URL for you to use in your Facebook ads so that you can start retargeting immediately. For example, if I am running a Amazon campaign and want to retarget, I would select the “claimdealoptions.com” cloaking domain, let’s assume my unique audience name was “Sharp Knife”. Once “Save” is clicked, the software will create claimdealoptions.com/sharp_knife as my unique URL. I can now take that URL and use it in my Facebook ads and the retargeting will be taken care of. 3. Settings Here, you can update your user profile as well as uploads/S4/ resocially-guide 1 .pdf
Documents similaires


-
100
-
0
-
0
Licence et utilisation
Gratuit pour un usage personnel Attribution requise- Détails
- Publié le Oct 19, 2022
- Catégorie Law / Droit
- Langue French
- Taille du fichier 2.2182MB


