
Honeywell Control Systems Ltd. Arlington Business Park, Bracknell Berkshire RG1
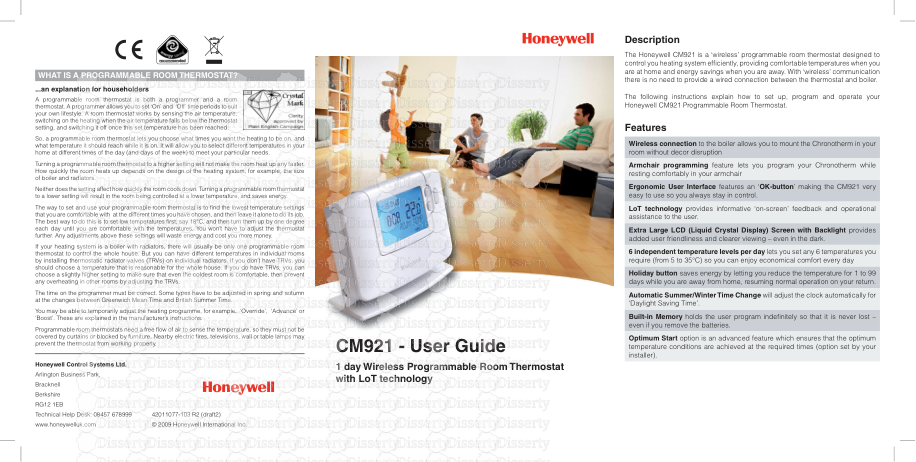
Honeywell Control Systems Ltd. Arlington Business Park, Bracknell Berkshire RG12 1EB Technical Help Desk: 08457 678999 www.honeywelluk.com CM921 - User Guide 1 day Wireless Programmable Room Thermostat with LoT technology 42011077-103 R2 (draft2) © 2009 Honeywell International Inc. Description The Honeywell CM921 is a ‘wireless’ programmable room thermostat designed to control you heating system efficiently, providing comfortable temperatures when you are at home and energy savings when you are away. With ‘wireless’ communication there is no need to provide a wired connection between the thermostat and boiler. The following instructions explain how to set up, program and operate your Honeywell CM921 Programmable Room Thermostat. Features Wireless connection to the boiler allows you to mount the Chronotherm in your room without decor disruption Armchair programming feature lets you program your Chronotherm while resting comfortably in your armchair Ergonomic User Interface features an ‘OK-button’ making the CM921 very easy to use so you always stay in control. LoT technology provides informative ‘on-screen’ feedback and operational assistance to the user. Extra Large LCD (Liquid Crystal Display) Screen with Backlight provides added user friendliness and clearer viewing – even in the dark. 6 independent temperature levels per day lets you set any 6 temperatures you require (from 5 to 35°C) so you can enjoy economical comfort every day Holiday button saves energy by letting you reduce the temperature for 1 to 99 days while you are away from home, resuming normal operation on your return. Automatic Summer/Winter Time Change will adjust the clock automatically for ‘Daylight Saving Time’. Built-in Memory holds the user program indefinitely so that it is never lost – even if you remove the batteries. Optimum Start option is an advanced feature which ensures that the optimum temperature conditions are achieved at the required times (option set by your installer). ...an explanation for householders A programmable room thermostat is both a programmer and a room thermostat. A programmer allows you to set ‘On’ and ‘Off’ time periods to suit your own lifestyle. A room thermostat works by sensing the air temperature, switching on the heating when the air temperature falls below the thermostat setting, and switching it off once this set temperature has been reached. So, a programmable room thermostat lets you choose what times you want the heating to be on, and what temperature it should reach while it is on. It will allow you to select different temperatures in your home at different times of the day (and days of the week) to meet your particular needs. Turning a programmable room thermostat to a higher setting will not make the room heat up any faster. How quickly the room heats up depends on the design of the heating system, for example, the size of boiler and radiators. Neither does the setting affect how quickly the room cools down. Turning a programmable room thermostat to a lower setting will result in the room being controlled at a lower temperature, and saves energy. The way to set and use your programmable room thermostat is to find the lowest temperature settings that you are comfortable with at the different times you have chosen, and then leave it alone to do its job. The best way to do this is to set low temperatures first, say 18°C, and then turn them up by one degree each day until you are comfortable with the temperatures. You won’t have to adjust the thermostat further. Any adjustments above these settings will waste energy and cost you more money. If your heating system is a boiler with radiators, there will usually be only one programmable room thermostat to control the whole house. But you can have different temperatures in individual rooms by installing thermostatic radiator valves (TRVs) on individual radiators. If you don’t have TRVs, you should choose a temperature that is reasonable for the whole house. If you do have TRVs, you can choose a slightly higher setting to make sure that even the coldest room is comfortable, then prevent any overheating in other rooms by adjusting the TRVs. The time on the programmer must be correct. Some types have to be adjusted in spring and autumn at the changes between Greenwich Mean Time and British Summer Time. You may be able to temporarily adjust the heating programme, for example, ‘Override’, ‘Advance’ or ‘Boost’. These are explained in the manufacturer’s instructions. Programmable room thermostats need a free flow of air to sense the temperature, so they must not be covered by curtains or blocked by furniture. Nearby electric fires, televisions, wall or table lamps may prevent the thermostat from working properly. WHAT IS A PROGRAMMABLE ROOM THERMOSTAT? 1..6 A UTOM ANOFF CM921 DATE PROG AUTO MAN OFF Contents GETTING STARTED WITH the CM921 STEP 1: Installing the Batteries. ......................................... 3 STEP 2: Setting the Date and Time. ................................... 4 STEP 3: Running the Built-In Heating Program................. 4 Programming the CM921 The Built-in Heating Program. ............................................ 5 Reviewing the Heating Program........................................ 5 Modifying the Heating Program. ........................................ 5 Disabling / Enabling Time Periods . ................................... 7 operating the CM921 Choosing the Operating Mode.......................................... 8 AUTO mode............................................................. 8 MAN mode............................................................... 8 OFF mode................................................................ 8 Adjusting the Time. ............................................................ 8 During Normal Operation.................................................. 8 Temperature Enquiry................................................ 8 Temperature Override.............................................. 9 Using the Special Functions. ............................................. 9 HOLIDAY Function................................................... 9 fine tuning the CM921 Changing the User Parameters....................................... 10 Change the Time Format. ....................................... 11 Reset the Built-in Program. ..................................... 11 Summer / Winter Time Change.............................. 11 FAQ’s & troubleshooting Trouble Shooting Guide................................................... 12 Frequently Asked Questions. ........................................... 14 WHAT IS A PROGRAMMABLE ROOM THERMOSTAT? An explanation for householders. .................................... 20 Controls Layout Day / Date Display Time Display LoT technology Display Heating On Indicator Battery Low Indicator Temperature Display Temperature Change Buttons Temperature Enquiry Button 1 2 3 4 5 6 7 8 9 10 11 12 13 14 15 Slider Switch Green OK Button Program Buttons Battery Compartment Lid Battery Compartment Holiday Function Button Time Change Buttons 14 15 1 2 3 5 4 6 8 9 10 7 13 12 11 This product and its associated documentation and packaging are protected by various intellectual property rights belonging to Honeywell Inc. and its subsidiaries and existing under the laws of the UK and other countries. These intellectual and property rights may include patent applications, registered designs, unregistered designs, registered trade marks, unregistered trade marks and copyrights. Honeywell reserves the right to modify this document, product and functionality without notice. This document replaces any previously issued instructions and is only applicable to the product(s) described. This product has been designed for applications as described within this document. For use outside of the scope as described herein, refer to Honeywell for guidance. Honeywell cannot be held responsible for misapplication of the product(s) described within this document. Manufactured for and on behalf of the Environment and Combustion Controls Division of Honeywell Technologies Sàrl, ACS-ECC EMEA, Z.A. La Pièce 16, 1180 Rolle, Switzerland by its Authorised Representative Honeywell Inc. 3 This section shows you how to setup and run the thermostat in 3 simple steps: STEP 1: Installing the Batteries Note: Please follow the instructions in this section only if the thermostat screen is blank (no symbols or digits are displayed). If the screen displays some information move on to STEP 2: Setting the Date and Time. To install the Batteries: a. Lift up the front cover of the thermostat to reveal the battery cover and product controls. b. Remove the battery cover by pressing down and sliding out. c. Insert the 2 x AA LR6 Alkaline Batteries supplied with the thermostat, ensuring the correct orientation (see ‘Controls Layout’ on page 2). d. After a short pause the thermostat will display information on the screen and is now ready for use. e. Replace the battery cover by sliding it firmly back into the front of the thermostat. GETTING STARTED WITH THE CM921 PLEASE RESPECT YOUR ENVIRONMENT! Take care to dispose of used batteries carefully. 4 STEP 2: Setting the Date and Time To set the Date and Time: a. Move the slider switch to the DATE position. ‘SET THE DAY’ will be displayed on the screen and the day digits will be flashing. b. Use the or buttons to set the correct day. When either of these buttons are pressed ‘DAY OK?’ will be displayed. Once the correct day is reached, press the green button to confirm. c. Now the month digits will start flashing and ‘SET THE MONTH’ will be displayed. Change the month and then the year using the or buttons, pressing the green button to save any changes made. (If an invalid date has been entered you will be returned to the start of the date setting mode). d. After setting a valid date, the time digits will begin flashing and ‘SET THE TIME’ will be displayed. e. Use the or buttons to set the correct time. Each press of the button will change the time by one minute and holding the button down will change the time slowly uploads/Geographie/ cm921-user-guide-description 1 .pdf
Documents similaires


-
47
-
0
-
0
Licence et utilisation
Gratuit pour un usage personnel Attribution requise- Détails
- Publié le Jui 10, 2022
- Catégorie Geography / Geogra...
- Langue French
- Taille du fichier 0.9363MB