
Q U I C K R E F E R E N C E G U I D E Lotus Notes ® 8.5.1 Getting to Know Lotus
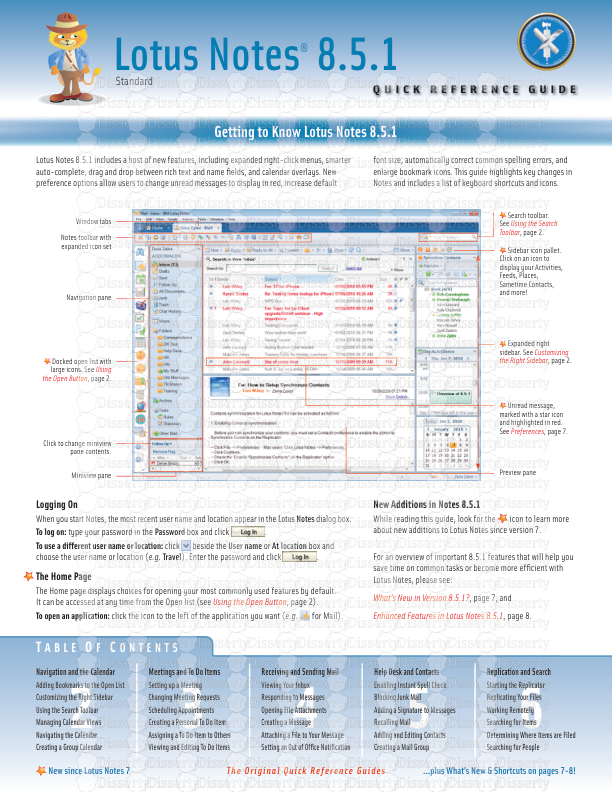
Q U I C K R E F E R E N C E G U I D E Lotus Notes ® 8.5.1 Getting to Know Lotus Notes 8.5.1 Lotus Notes 8.5.1 includes a host of new features, including expanded right-click menus, smarter auto-complete, drag and drop between rich text and name fields, and calendar overlays. New preference options allow users to change unread messages to display in red, increase default font size, automatically correct common spelling errors, and enlarge bookmark icons. This guide highlights key changes in Notes and includes a list of keyboard shortcuts and icons. T A B L E O F C O N T E N T S 2 3 4 6 T A B L E O F C O N T E N T S 2 3 4 5 6 Navigation and the Calendar Adding Bookmarks to the Open List Customizing the Right Sidebar Using the Search Toolbar Managing Calendar Views Navigating the Calendar Creating a Group Calendar Meetings and To Do Items Setting up a Meeting Changing Meeting Requests Scheduling Appointments Creating a Personal To Do Item Assigning a To Do Item to Others Viewing and Editing To Do Items Receiving and Sending Mail Viewing Your Inbox Responding to Messages Opening File Attachments Creating a Message Attaching a File to Your Message Setting an Out of Office Notification Help Desk and Contacts Enabling Instant Spell Check Blocking Junk Mail Adding a Signature to Messages Recalling Mail Adding and Editing Contacts Creating a Mail Group Replication and Search Starting the Replicator Replicating Your Files Working Remotely Searching for Items Determining Where Items are Filed Searching for People The Original Quick Reference Guides ...plus What’s New & Shortcuts on pages 7-8! Logging On When you start Notes, the most recent user name and location appear in the Lotus Notes dialog box. To log on: type your password in the Password box and click . To use a different user name or location: click beside the User name or At location box and choose the user name or location (e.g. Travel). Enter the password and click . The Home Page The Home page displays choices for opening your most commonly used features by default. It can be accessed at any time from the Open list (see Using the Open Button, page 2). To open an application: click the icon to the left of the application you want (e.g. for Mail). New Additions in Notes 8.5.1 While reading this guide, look for the icon to learn more about new additions to Lotus Notes since version 7. For an overview of important 8.5.1 features that will help you save time on common tasks or become more efficient with Lotus Notes, please see: What’s New in Version 8.5.1?, page 7, and Enhanced Features in Lotus Notes 8.5.1, page 8. Search toolbar. See Using the Search Toolbar, page 2. Sidebar icon pallet. Click on an icon to display your Activities, Feeds, Places, Sametime Contacts, and more! Expanded right sidebar. See Customizing the Right Sidebar, page 2. Unread message, marked with a star icon and highlighted in red. See Preferences, page 7. Preview pane Docked open list with large icons. See Using the Open Button, page 2. Notes toolbar with expanded icon set Window tabs Navigation pane Miniview pane Click to change miniview pane contents. Standard New since Lotus Notes 7 Copyright © 2009 Nevada Learning Series Inc. Navigation and the Calendar 2 Navigating in Notes You can navigate to your various work areas, bookmarks, and applications using the Open button, right sidebar, and search toolbar. Using the Open Button The Open button displays the Open list, which provides access to all of your work areas, bookmarks, links, and applications. To display the Open list: at the top left of your screen, click . To make the Open list visible at all times: choose ViewDock the Open List. A panel displaying icons from the Open list appears. To close the panel, right- click an open area in the list and choose Dock the Open List. Adding Bookmarks to the Open List Organized in the Open list, bookmarks link to commonly accessed locations. To add an item to the Open list or to a folder: open any window (e.g. Mail). Click and drag an item (e.g. a message) to an empty space on the Open list or to a folder in the list; alternatively, click the item and choose CreateBookmark. In the Add Bookmark dialog box, enter the bookmark name and click OK. To find an application or document that you have bookmarked: click , and enter the name of the application or document in the Type to find box. As you type, Notes will display a list of possible matches. Click on an entry to select and open it. To create a bookmark folder in the Open list: click , right-click the Favorite Bookmarks, Applications, or More Bookmarks folder, and choose New Folder. In the Create Folder dialog box, type a name for your folder in the Folder name box and click OK. To set a bookmark as your Home page: click , right-click a bookmark, and choose Set Bookmark as Home Page. Click Yes. To reset the Home page to the default: click Favorite Bookmarks and right-click Default Home Page. Choose Set Bookmark as Home Page. Click Yes. To remove a bookmark: right-click the bookmark and choose Remove. Customizing the Right Sidebar On the right side of the screen you’ll find a panel, called the right sidebar, which displays your Notes applications. To open, minimize, and close the right sidebar: choose ViewRight Sidebar and then choose Open to expand it, Thin to minimize it, or Closed to collapse it. To choose which applications appear in the right sidebar: choose ViewRight Sidebar Panels and click the application you want to add ( appears beside it). Click the application again to remove it from the right sidebar. To expand an application in the right sidebar: click the application icon (e.g. Day-At-A-Glance icon). Using the Search Toolbar You can use the toolbar at the top right of your screen from anywhere within Notes to perform a full text search of your Mail, Calendar, Contacts, and the internet. To search an open folder/view: type a search term in the toolbar search box and click Search. To search a specific location: click the arrow to the left of the toolbar and choose a location. Type a search term in the search box and click Search. Using the Calendar The Calendar helps you to schedule appointments and organize your time. You can choose calendar views, summarize meetings, create group calendars, and print calendars with various levels of detail. Click and choose Calendar to open the Calendar window. Managing Calendar Views To choose a calendar view: in the calendar views section of the Navigation pane, click a view option (e.g. One Work Week). To summarize all meetings, appointments, and tasks for the current view: click and choose Summary. Click and choose Summary again to return to full Calendar view. To clean up your calendar by deleting older items: click and choose Calendar Cleanup. In the Calendar Cleanup dialog box, choose the age and type of calendar items you want to delete and click OK. To filter the calendar view: click , choose Filter by, and then choose an option (e.g. Chair). If a dialog box opens, refine your filter selection and click OK. To remove a filter, click , choose Filter by, and then choose None. Navigating the Calendar To go to another month: click the arrows above the calendar to go to the next month or the previous month. To go to another date: click the day on the date picker or in the Calendar view. Press the arrow keys on your keyboard to go to previous or subsequent days. To return to today’s date: click above the date picker. Creating a Group Calendar Create a group calendar to view the schedules of other Notes users. 1. Click and choose Create Group Calendars. In the Group Calendars window, click . 2. In the New Group Calendar dialog box, type a name for the group in the Title section, and click at the bottom right of the Members box. 3. In the Select Names dialog box, click a name you want in the group, and then click to move them to the Names section on the right. 4. Click OK to close the Select Names and New Group Calendar dialog boxes. The group calendar opens, and its name is added to your Group Calendars list. Printing a Calendar 1. Click on the Notes toolbar or press ctrl+p. 2. In the Print Calendar dialog box, under the tab, choose a print option from the Calendar style list (e.g. Weekly Style). 3. In the Print Range area, click in the From and to boxes and set the date range you want to print. Click the tab and choose any desired style options (e.g. Hide private entries). Click uploads/s1/ getting-to-know-lotus-notes-8-5-1.pdf
Documents similaires


-
41
-
0
-
0
Licence et utilisation
Gratuit pour un usage personnel Attribution requise- Détails
- Publié le Nov 29, 2022
- Catégorie Administration
- Langue French
- Taille du fichier 4.2577MB