
Raptor – User Guide Please Note: the guide has been produced with the intent to
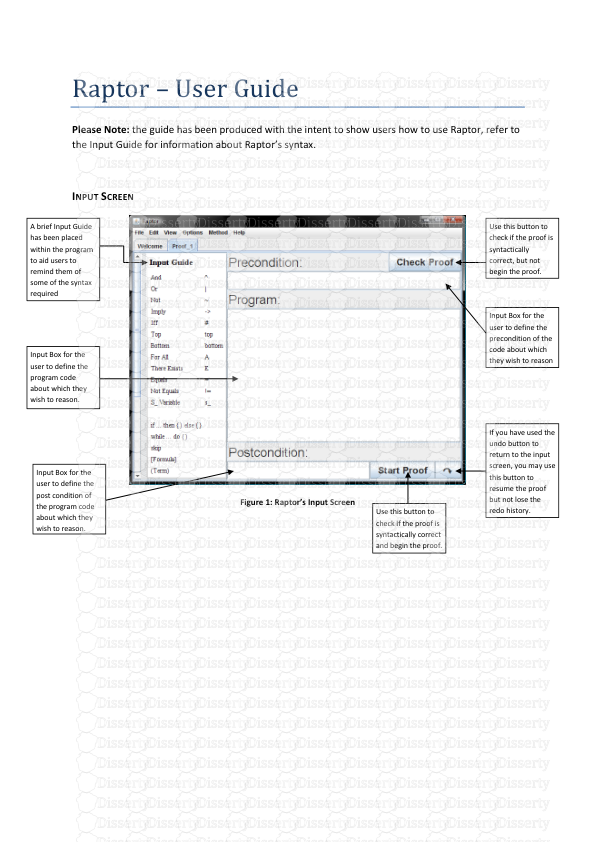
Raptor – User Guide Please Note: the guide has been produced with the intent to show users how to use Raptor, refer to the Input Guide for information about Raptor’s syntax. INPUT SCREEN Figure 1: Raptor’s Input Screen A brief Input Guide has been placed within the program to aid users to remind them of some of the syntax required Input Box for the user to define the program code about which they wish to reason. Input Box for the user to define the post condition of the program code about which they wish to reason. Use this button to check if the proof is syntactically correct and begin the proof. If you have used the undo button to return to the input screen, you may use this button to resume the proof but not lose the redo history. Input Box for the user to define the precondition of the code about which they wish to reason Use this button to check if the proof is syntactically correct, but not begin the proof. THE RULES Figure 2: Raptor’s Proof Rule Pane SEMI RULE 1. Select a body of more than one program line which involves a semi-colon and click semi. 2. The body of program lines is split at the last semi-colon and the two parts of the body are put into their own proof boxes and these boxes are added to the proof. An unknown is added at the start of the first box; representing the condition that holds before the code execution begins. Another unknown is added such that it is the goal of the first box and the assumption to the second box; representing a condition which holds between lines of code. Another unknown is added to the end of the second box; representing the condition which holds after the code has completed. ASSIGNMENT RULE 1. Select a program line which represents an assignment and click assg. 2. For the goal formula below the assignment, which must not be unknown, every occurrence of the left hand side of the assignment replaced by its right hand side and added to the proof, above the assignment as the new goal. METHOD RULE 1. Select the assignment statement which is an assignment involving a method call and click method. 2. The precondition and post condition of the method call is added to the proof; the goal below the method call remains a goal in the proof box, the post condition is added as an assumption and the precondition is added as a sub goal in the proof box. IF RULE 1. Select an if statement and click if. 2. Two new proof boxes are added to the proof; the assumption to one box is the condition of the if statement and the assumption of the other is the negated version of the condition. Both boxes have the same goal which you must instantiate. Similar to the semi rule, an unknown is added to the start of both boxes which represents the condition that holds before the if statement. WHILE RULE 1. Select a while loop and click while. 2. A new proof box is added to the proof; two assumptions are added to this new box, the while loop condition and the loop invariant. You must instantiate an invariant appropriate to the while loop. The goal for this box is the invariant, as you must re-establish the invariant after the loop code. SKIP RULE 1. Select the skip statement and click skip. 2. The proof line below the skip statement is added above the skip as the new goal. ∧I RULE FORWARDS: 1. Select an empty line and click ∧I. 2. Select the two formulae for which you would like to introduce the And; the order you select them in is the order in which they will appear in the resulting formula. BACKWARDS: 1. Select a goal line which is an And formula and click ∧I. 2. Two new proof boxes will appear, one with the left sub formula of the formula from step 1, as its goal and the other with the right sub formula as its goal. ∧E RULE FORWARDS: 1. Select an empty line and click ∧E. 2. You will then be asked if you wish to derive the left sub formula or the right sub formula or both. BACKWARDS: 1. Select a goal formula, which can be any formula. 2. You will then be asked if the selected formula should be on the left or right side of the And symbol. 3. Type in the formula for the other side. ∨I RULE FORWARDS: 1. Select an empty line and click ∨I. 2. Select the line containing the formula you wish to be used by this rule. 3. You will then be asked if the selected formula should be on the left or right side of the Or symbol. 4. Type in the formula for the other side. BACKWARDS: 1. Select the goal line which is an Or formula and click ∨I. 2. You will then be asked which side of the Or formula to derive as the new goal; the left side or the right. ∨E RULE FORWARDS: 1. Select an empty line and click ∨E. 2. Select the Or formula you would like to use the ∨E rule with. 3. You will then be asked for the goal that you would like to derive from the Or Elimination. Two new proof boxes will be added to your proof with the left side of the Or as the assumption at the top of one of the boxes and the right as the assumption of the other box, and the goal for each box is the formula you were asked to enter to be derived. BACKWARDS: 1. Select a goal formula that you wish to derive and click ∨E. 2. Select the Or formula that you would like to derive the goal from. 3. Two new proof sub boxes will be added to your proof with the left side of the Or as the assumption at the top of one of the boxes and the right as the assumption of the other, and the goal being the goal for each box. →I RULE FORWARDS: 1. Select an empty line and click →I. 2. You will be asked to input the implication which you would like to derive. 3. A new proof box is added to the proof with the antecedent of the implication that you wish to prove at the top of the box as an assumption and the consequent as the goal for the box. BACKWARDS: 1. Select a goal which is an implication formula and click →I. 2. A new proof box is added to the proof with the antecedent of the goal at the top of the box as an assumption and the consequent as the goal for the box. →E RULE FORWARDS: 1. Select an empty line and click →E. 2. Select the left sub formula (the antecedent) of the implication for which you would like to perform an →E. 3. Select the implication. 4. The consequent of the implication is added to the proof. BACKWARDS: 1. Select the goal line which has the consequent of the implication for which you wish to perform the →E. 2. Select the implication. 3. The antecedent is added to your proof as the new goal. ⊥I RULE FORWARDS: 1. Select an empty line and click ⊥I. 2. Select the two contradictory formulae. BACKWARDS: 1. Select the goal which is a Bottom formula and click ⊥I. 2. Select the formula for which you would like to derive the contradiction. 3. The negated version of the selected formula is added as the new goal to the proof. ⊥E RULE FORWARDS: 1. Select an empty line and click ⊥E. 2. Select the line containing the Bottom formula. 3. Enter the formula you would like to introduce. BACKWARDS: 1. Select a goal formula and click ⊥E. 2. A Bottom formula is added to the proof as the new goal. PC RULE FORWARDS: 1. Select an empty line and click PC. 2. Enter the formula you would like to derive by contradiction. 3. A new proof box is added to your proof with the negated version of your entered formula as an assumption to the box and Bottom as its goal. BACKWARDS: 1. Select the goal formula you wish to derive by contradiction and click PC. 2. A new proof box is added to the proof with the negated version of the goal as its assumption and Bottom as its goal. ¬¬ RULE FORWARDS: 1. Select an empty line and click ¬¬. 2. Select a Not-Not formula to eliminate the ¬¬ from. BACKWARDS: 1. Select a goal formula and click the ¬¬. 2. A new formula is added which is the selected formula with Not-Not on the front of it, as the new goal. ↔I RULE FORWARDS: 1. Select an empty line and click ↔I. 2. You will be asked to uploads/S4/ user-guide 47 .pdf
Documents similaires


-
65
-
0
-
0
Licence et utilisation
Gratuit pour un usage personnel Attribution requise- Détails
- Publié le Dec 23, 2022
- Catégorie Law / Droit
- Langue French
- Taille du fichier 0.4750MB